Sunday, March 28, 2010

Chocolate Mint Brownies

I wanted to bring in a treat to my office for St. Patrick's Day, I am not Irish, but I love any good excuse for treats!  I had seen a version of these brownies in an issue of Cooking Light over a year ago, and I had been thinking about making them ever since, and I finally had the perfect opportunity!  The original recipe has you actually make the brownie part from scratch; but since I had hit at sale at Fry's a few months ago and got brownie mix for $1.00 per box, I thought it just made more sense to use what I already had (plus, it was the dark chocolate kind...my favorite)!  So I whipped up the brownie base on the Sunday night before the big day, and then made the toppings the night before.  The layers were really easy to make, I had just a little bit of trouble with gettting the chocolate layer to cover the entire pan, but other than that, these were a cinch to make! When I went to the store, I picked up mint extract instead of peppermint extract, and I think I am going to have to buy the peppermint for next time because the pure mint is just a hint too strong...a bit like toothpaste...and well, chocolate and toothpaste just don't mix!  No one else that tried these seemed to notice or mind, everyone at my office loved these, and what is not to love?  Dark, rich chocolate with a splash of cool minty filling equals deliciousness! 


Chocolate Mint Brownies
adapted from Cooking Light


Brownie Layer:
1 box (Family size for a 13 x 9 dish) brownie mix of your choice
Extra ingredients required on brownie box

Mint layer:
2 c. powdered sugar
1/4 c. butter, melted
2 Tbsp. milk
1/2 tsp. peppermint extract
2 drops green food coloring

Glaze:
3/4 c. semisweet chocolate chips
3 Tbsp. butter

Preheat oven according to brownie box directions.  Prepare and bake brownies as directed by the box.  Cool completely.

To prepare mint layer, combine powdered sugar, 1/4 cup melted butter, and next 3 ingredients (through food coloring) in a medium bowl; beat with a mixer until smooth. Spread mint mixture over cooled cake.

To prepare the glaze, combine the chocolate chips and 3 tablespoons butter in a medium microwave-safe bowl. Microwave at HIGH 1 minute or until melted, stirring after 30 seconds. Let stand 2 minutes. Spread chocolate mixture evenly over top. Cover and refrigerate until ready to serve. Cut into 20 pieces.

Wednesday, March 24, 2010

Creamy Chicken Taquitos

So as you can tell from all my previous posts, I am a huge Mexican food lover!!  But what you may have not caught on to, is when it comes to Mexican food, I rarely choose chicken as my filling of choice.  I will choose a beef or pork dish over chicken almost any day; I couldn't even tell you the last time that I ordered something at a Mexican restaurant that involved chicken (and well, I go to Mexican restaurants at least a couple times a week)!  With that being said, I was oddly drawn to make these creamy chicken flautas, I saw them pop up on a bunch of blogs, and the ingredients in the filling sounded so delicious, that I decided to just give it a whirl.  I am so glad that I tried this, not only is the filling so easy to put together, but it is delicious!!  While mixing it up I was considering not even putting this in the tortillas, just heating it up and eating it with a spoon!  The flavors are so fresh and really pop, that I just loved the combination!  Since these are baked and not fried, this is actually quite a healthy meal, loaded with lean protein! 

My sister came over for dinner the night that I made these, and she was a big fan as well.  I really wish that I had taken a picture of the gooey filling for you all, but you will just have to trust me and try it out for yourselves!  But a word of warning: line the baking sheet with foil, because some of the filling is bound to escape!

Creamy Chicken Taquitos
adapted from On My Menu

4 oz. reduced-fat cream cheese
1/4 c. green salsa
1 Tbsp. fresh lime juice
1/2 tsp. cumin
1 tsp. chili powder
1/2 tsp. onion powder
1/4 tsp. garlic powder
3 Tbsp. chopped cilantro
2 Tbsp. sliced green onions
1 (12.5 oz) can solid white chunk chicken, drained (Or sub 2 cups cooked chicken)
1 c. grated pepperjack cheese
12 small corn tortillas
Kosher salt
Cooking spray

Preheat oven to 425. Line a baking sheet with foil and lightly coat with cooking spray.

Warm the cream cheese in the microwave for about 20-30 seconds so it's soft and easy to stir. Add green salsa, lime juice, cumin, chili powder, onion powder and garlic powder. Stir to combine, and then add cilantro and green onions. Add chicken and cheese and combine well.

Working with a few tortillas at a time, heat them in the microwave until they are soft enough to roll without cracking. Place 2-3 Tbsp. of chicken mixture on the lower third of a tortilla, keeping it about 1/2 inch from the edges, and then roll it up as tight as you can. Place seam side down on the baking sheet. Spray the tops of the tortillas lightly with cooking spray and sprinkle some kosher salt on top.

Place pan in oven and bake for 15-20 minutes or until crisp and the ends start to get golden brown.

Serve with sour cream, guacamole, salsa and/or shredded cheese!

Sunday, March 21, 2010

Quick Restaurant Style Salsa

As a born and raised Arizona girl, I grew up eating chips and salsa; actually, a lot of chips and salsa!  There is just something so refreshing about salsa on a hot day, it is the perfect snack, and if you don't overdo it on the chips it is quite healthy too!  I have never made my own tomato based salsa before so when I saw this recipe pop up and I read how easy it was to make, I figured that the time had come!  This really does taste like the salsa you get in a lot of restaurants, and since it starts with canned tomatoes, it couldn't be easier, or cheaper!  I whipped this up in my food processor in less than 2 minutes....seriously!  The flavor gets better after it is refrigerated for awhile, so I would suggest making it a bit ahead of when you want to eat it, but if you just can't resist....it will still be tasty!

Quick Restaurant Style Salsa
adapted from Taste Buds

2 (15 oz. each) cans Mexican-Style stewed tomatoes
1(4 oz.) can chopped green chilies
1/2 bunch cilantro, rinsed
1 bunch green onions (stems and bulbs), rinsed
1 tsp garlic salt or powder (I used powder)
1 tsp ground cumin
1 Tbsp Worcestershire sauce
2 Tbsp vinegar
Using a food processor (or blender), blend tomatoes, cilantro, garlic, cumin, Worcestershire, and vinegar. Add onions and chilies. Stir and serve with chips.

See....I told you it was easy!

Saturday, March 20, 2010

Shrimp Pot Pies

Hi, my name is Jenn, and I am a blogging slacker!  I don't know what my funk has been all about, I have actually made quite a few things over the last couple of weeks, it is just every time I think about sitting down to post, I just don't want to!  Maybe it is because I have hit my one year of blogging mark and I am losing some steam, but whatever it is, IT NEEDS TO STOP!  I need to just snap out of it and post what I cook, because I really do enjoy sharing my adventures on here.  So if I have a long, unexplained absence again, send me a note and kick my virtual butt!

So, onto the food now....and this was some good food!  One of my favorite blogs that I follow is Cassie Craves, almost everything that she makes appeals to me, and nothing is too crazy fancy.  When I saw the recipe for the Shrimp Pot Pies pop up on her blog, I wanted to make them, and I wanted to make them pronto!  She adapted the recipe from Sunny Anderson on the Food Network, and I went a bit further and took my own liberties....but that is the fun part about cooking!  I think I got a bit heavy handed with the salt, but other than that, these were delicious!  My only issue with these were the puff pastry shells, mine didn't get cooked all the way through in the middle by the time they were browned on the outside, not sure what the problem was, but I guess I may just not be good with puff pastry!  If you can't find the pastry shells, you can always use puff pastry sheets and just cut them in larger rectangles!  Either way, the filling is yummy, and since I substituted half and half for the heavy cream, these weren't too terrible for the waistline!

Shrimp Pot Pies
adapted from Cassie Craves

4 - 6 frozen puff pastry shells
1 (1 lb.) package frozen uncooked medium shrimp (buy them shelled and deveined)
1/4 teaspoon seasoned salt
1 tablespoon olive oil
2 tablespoons unsalted butter
1 small onion, chopped
2 small carrots, diced
2 cloves minced garlic
1/2 cup white wine
2 cups half and half
Salt and white pepper

Preheat oven to 400 degrees.  Place puff pastry shells on baking sheet and bake per the package instructions.

Meanwhile, season the shrimp with cayenne pepper, salt and black pepper. In a medium saucepan over medium-high heat, add oil and 1 tablespoon butter. Saute the shrimp, 1 minute per side. Remove shrimp and set aside.
Add remaining butter to the pan and saute onions and carrots until softened about 10 minutes. Add garlic; cook and stir 30 seconds. Add wine, bring to a simmer and cook until most of the wine has evaporated. Add the half and half and bring back to a simmer until the sauce thickens to a gravy consistency, about 12 to 15 minutes.

Place the shrimp back into the sauce to coat. Season with salt and white pepper. Ladle the shrimp mixture onto the bottom halves of the puff pastry shells; enjoy!

Sunday, March 7, 2010

Cafe Carumba

A couple of weeks ago we had one of our monthly alum dinners that I am in charge of planning.  I couldn't quite figure out where to go; it is getting hard because I don't like to repeat restaurants, but eventually I decided on Cafe Carumba which is in Old Town Scottsdale.  I had been there once, when it just opened about 4 years ago, but after I looked at the menu I could see that it had been revamped, so I was excited to try it.  Our group arrived, and we thought the interior was cute, decorated in modern Southwestern decor, but we were shocked to see only about 2 other tables occupied....and it was 7:00 on a Friday night!?!  Nevertheless, we were there, we were hungry, and we figured we would't have to wait too long!

We started off with the Nacho Bowl, which was basically all of the nacho toppings placed in  bowl with chips to dip in it.  The girls that ordered it really liked it, but I thought that it was missing a key element to nachos...the cheese!  It was just seasoned ground beef, sour cream, onions and tomatoes; while all the ingredients were tasty, I think some cheese would have made things a whole lot better!  But it didn't stop them from scraping the bowl clean!


One of the other girls wasn't too hungry, so she opted for the Caracas Chopped Salad, which was a combination of grilled chicken, black beans, corn, tomatoes and cojita cheese served on romaine. The presentation of the salad was very nice, the bright colors of the corn and tomatoes made it look very appetizing. The chicken was nicely cooked and the combination of all the simple flavors made for a nice, light meal.


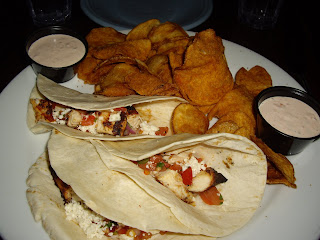
The most popular item with our group was the Taco Platter, three out of group of seven ordered it, but they all chose different fillings!  The picture below shows the grilled chicken tacos, but there was also on order of the steak tacos and the pork tacos too!  Everyone liked their tacos, the fillings were generous and the flavors were good, and since the platter came with three tacos and two side dishes....there were a lot of leftovers!  We all thought that the choices for side dishes were quite unique, not just your typical rice and beans.  We tried almost all of them amongst us; the side salad, sweet potato fries, homemade potato chips, black beans, pinto beans and even the roasted mushrooms and spinach!  The homemade chips and the sweet potato fries were our favorites, but they were all quite good.


My sister opted for the most unique entree out of group, she ordered the Chicken Oscar "Carumba" Style!  The dish was a grilled chicken breast topped with two crab cakes, asparagus and topped with an ancho hollandaise sauce.  The presentation was lovely; the chicken was cooked perfectly and the crab cakes were full of crab, but the only thing that didn't make this an out of this world dish for her was that the sauce was a bit too spicy for her.  I tasted the sauce and liked it, so if you don't mind a bit of spice, this is a fun Southwest twist on a classic dish!


There were a lot of items that sounded good to me on the menu, but ultimately I decided to go with the Green Chile Pork.  I love green chile pork, and I usually measure most against the one at Z'Tejas, so I was intrigued to try this version.  It was served in a hot skillet with warm tortillas on the side.  I tried a bite of the pork first and it was very tender, it just fell apart, but I didn't really get much green chile flavor.  I scooped some into a tortilla, along with some pinto beans and took a bite, it was good, but it just didn't have that much flavor, the beans overpowered the pork!  It was not a terrible dish, but I guess I am a bit of a Green Chile snob....and this one is not one that I will be ordering again!


Overall, we had a nice experience at Cafe Carumba, the food was good for the most part and the service was quick.  I am still perplexed as to why the restaurant was so empty the entire time that we were there, but I have heard that it is a popular brunch spot on the weekends, so I may have to go and check that out.  I would go back again to try out their happy hour as well, especially, since unlike almost all the other restaurants in Old Town, they actually have their own parking lot!

Cafe Carumba
7303 E. Indian School Rd.
Scottsdale, AZ 85281
http://www.cafecarumba.com/