Wednesday, January 27, 2010

Banana Cream Cheesecake

I know that I may have mentioned this before, but I LOVE CHEESECAKE!  It doesn't really matter what flavor; plain, chocolate, peanut butter, I love them all!  When I came across this recipe for Banana Cream Cheesecake I knew I had to give it a try; while I had never had banana cheesecake before, I like banana cream pie....so how could this not be good?

I made this for the dessert course of my football party, let's just say that things were not going so well for our team by the time I brought this out, but this seemed to perk everyone up right away!  We all loved this spin on cheesecake, some opted for whipped cream and others kept it plain, but the results were delicious nonetheless!  I think this is only the second cheesecake I had ever made in my life, and it uses a unique low temperature cooking method, but it turned out just perfect and the top didn't even crack! 


Banana Cream Cheesecake
adapted from Our Krazy Kitchen

CRUST:
20 vanilla cream-filled sandwich style cookies
1/4 c. buter, melted

FILLING:
3 (8 oz. each) pkgs. cream cheese, softened (I used light)
2/3 c. sugar
2 Tbsp. cornstarch
3 eggs
3/4 c. finely mashed banana (I just threw two into the mixer and let it do the mashing!)
1/2 c. whipping cream
1 tsp. vanilla extract
1 tsp. maple extract (I didn't use this)

Use a blender to finely chop the cookies; add melted butter and stir until well blended.  Press mixture into the bottom of a 10" springform pan and smooth it out.  Refrigerate crust while making the filling.

Beat cream cheese until smooth and creamy.  Add in the sugar and corstarch, followed by one egg at a time.  Beat in the bananas, whipping cream and vanilla until smooth.  Pour mixture into the crust.

Place pan on a cookie sheet and bake at 350 degrees for 15 minutes.  Then, reduce the oven temperature to 200 degrees and bake an additional 75 minutes, or until center is almost set.  Allow to cool for at least 30 minutes, then refrigerate, uncovered for at least 6 hours before serving.

Slice and serve with whipped cream, banana slices and/or even caramel sauce!


Tuesday, January 26, 2010

Alton Brown's Buffalo Wings

One of my New Year's Cooking Resolutions was to cook something out of all the cooking magazines that I subscribe to within a month of receiving them in the mail; well wouldn't you know that within just days of making that resolution my first magazine appeared in the mailbox.  I have been getting Food Network Magazine for about a year now, and honestly, I haven't made much out of it; like with most resolutions I am bound and determined to stick to them especially since it is still only January!  I decided to try these chicken wings from Alton Brown that appeared in the magazine because unlike most wings they are baked and not fried, and while they were good, boy did this reaffirm my dislike for Alton Brown....why does he have to make things so complicated?  I have never been a fan of his show, I find him to be really annoying, but nevertheless, the recipe got good reviews so I figured I would give it a shot.  I had never made chicken wings from scratch before and I think it can be done much easier with the same results.  But if you feel like undertaking a project, give these a try.


Alton Brown's Buffalo Wings
from Food Network Magazine January/February 2010

12 whole chicken wings (I used a 4 lb. bag of already separated wing portions)
3 oz. (6 Tbsp.) unsalted butter
1 small clove garlic, minced (I omitted)
1/4 c. hot sauce (I used Frank's Red Hot Buffalo Style)
Kosher salt

Place a 6-quart saucepan, with a steamer basket and 1 inch of water in the bottom, over high heat, cover and bring to a boil.

If using whole wings, remove the tips of the wings and discard.  Use kitchen shears or a knife to separate the wings at the joint.  Place the wings in the steamer basket, cover, reduce the heat to medium and steam 10 minutes. (I had to do this in 2 batches.)  Remove the wings from the basket and carefully pat dry.  Lay out the wings on a cooling rack set in a half sheet pan lined with paper towels and place in the refrigerator to dry, about 1 hour.

Preheat the oven to 425 degrees.  Remove the paper towels from the pan and replace with parchment paper.  Roast on the middle rack of the oven, about 20 minutes.  Turn the wings over and cook 20 to 30 more minutes, or until the meat is cooked through and the skin is golden brown.

While the chicken is roasting, melt the butter in a small bowl with the garlic (if using).  Pour this along ith the hot sauce and 1/2 tsp. salt into a bowl large enough to hold all of the chicken and stir to combine.  Remove the wings from the oven, transfer to the bowl and toss with the sauce.  Serve warm.

Wednesday, January 20, 2010

BBQ Shrimp

This was my second time making these shrimp, the first being before my blogging days, but I just had to share these with my readers because they are so good and so easy!  They are most like the BBQ shrimp that they serve down in New Orleans, a thin sauce that is slightly spicy and oh so good.  Make sure to make some garlic bread to go along with these, because you will definately want something to dip into the delicious sauce!  Make sure to have lots of napkins ready, because these are peel and eat, so things could get messy!

Also, for easier clean up, I would recommend using a dispoable aluminum pan!


BBQ Shrimp
adapted from Recipezaar

2 lbs unpeeled large raw shrimp (I use the easy-peel kind to make it easier to eat)
1 lemon, cut into wedges
2 bay leaves
1/2 c. butter, melted
1/2 c. ketchup
1/4 c. worcestershire sauce
2 garlic cloves, chopped
1 1/2 Tbsp. Old Bay Seasoning
1/2 tsp. dried rosemary
1 tsp. dried thyme

Place shrimp in a 13- x- 9-inch pan; top with lemon wedges and bay leaves. Stir together butter and next 6 ingredients. Pour over shrimp.

Bake, uncovered, at 400° for 35 minutes or until shrimp are pink, stirring every 10 minutes. Discard bay leaves.

Serve with garlic bread and lemon wedges.

Tuesday, January 19, 2010

Jalapeno Popper Dip

With my beloved Arizona Cardinals in the playoffs, I decided to have a few friends over to watch the game.  Well, a game viewing party is not complete without food to snack on, so I decided to cook up a spread.  It was a mix of tried and true favorites and some new recipes, and I am glad to say, that I have now have some new dishes to add to my tried and true collection!

This Jalapeno Popper Dip that I found over on Big Red Kitchen is delicious!  It has just the right amount of heat, and actually could have more, but even my spicy food avoiding sister liked this, so I would say that it is just perfect!  We ate it with both tortilla chips and Ritz crackers and both were delicious!


Jalapeno Popper Dip
adapted from Big Red Kitchen

2 (8 oz. each) pkgs. cream cheese, softened
1 c. mayonnaise
1 c. shredded Mexican blend cheese
1/2 c. Parmesan cheese, grated
1 (4 oz) can chopped green chilies
1 (4 oz) can chopped jalapenos

1 c. panko bread crumbs
1/2 c. Parmesan cheese
1/4 c, butter, melted

Blend together the first 6 ingredients and process until smooth. You do not need to drain either can of peppers. Spread the dip into a greased 2 quart casserole. In a bowl mix bread crumbs and the other 1/2 cup of Parmesan cheese. Pour melted butter over top crumb mixture and mix well. Sprinkle crumb mixture evenly over the dip and bake in a 375° oven for about 20 minutes. You want the top to get browned and the dip to be heated through and bubble gently on the edges. Serve with Tortilla Chips and/or Ritz crackers.

Monday, January 18, 2010

Football & Dishes

I am a huge football fan; college football and NFL, I watch it all.  And I usually start to get pretty sad around the time the season ends, which as of today, is only 3 weeks away :(  It is a long time between the Super Bowl in early February until pre-season starts in August.  But during the season, I live for the weekends!  I tailgate with my friends at all the ASU home games, travel to a few away games (going to Wisconsin this year!) and organize my Sundays around what time the Cardinals will be playing.  Three years ago, some people at my office were organizing a Fantasy Football League and asked if I wanted to join, I had never played before but figured I would give it a shot....well get this...I won the league!  From that point on I was hooked, last year I took second place and this year I took first place again!  Who says a girl doesn't know anything about football?!?!

Each year along with the title, I have earned a nice cash prize, and well, even though it is nice to have some spare cash, I like to treat myself to something just for me.  This year I decided that I would get myself some new dishes.  The dishes that I had were the ones when I first moved out on my own after college; I moved into my house with a bed, a tv and an old recliner....I had nothing.  I also was still working as an intern at the time and made very little money, so I needed the essentials, but on the cheap.  I bought an 8 piece set of dishes, with dinner plates, salad plates, bowls and mugs for $15!  Now don't get me wrong, they have been good dishes, but I had been wanting to upgrade, so this was my opportunity!

I found a great deal on these dishes at Macy's....when I saw them on-line I knew they were the ones that I had to have.  Plus, they were on sale, and with all my coupons, I didn't even spend all my winnings, so now I do have a little spare cash!  I did end up having to go to three different Macy's in order to get all the pieces that I wanted....but it was worth it!


Here is my new dinner plate (white with black rim), salad plate (floral print) and bowl (white with black rim).  Oh yeah, and that is my little kitchen helper!


I also got some cute serving dishes in the floral print to go with the new set. 
(I actually got 6 of the little dishes, prefect for sauces, etc.)


While I was at Macy's getting my dishes, I spied this cute cupcake tower that was on sale; I just couldn't resist!  Looks like I need to make some cupcakes soon!

Sunday, January 17, 2010

Tamales

Whenever I tell someone that I am making homemade tamales I always get the same reaction, "Wow, that is so much work."  Well, if someone had told me they were making homemade tamales a couple of years ago I would have had the same reaction, but now I know, it really isn't all that hard!  Now, in saying that, I don't grind my own masa or anything, and maybe that is where the difficult part lies, but with store bought masa it couldn't be easier!  It has become a tradition now for me, my sister, my mom and my aunt Martha to get together and spend an afternoon making tamales.  Yes, it does take some time for them to cook, and the more people helping to assemble the better, but the results are so worth it!  This would also be a really fun dinner party idea, invite a group of people over to help assemble the tamales and then drink margaritas and eat guacamole while they cook....hmmm....maybe I am going to have to do that!


My sister, mom, Aunt Marth & Me showing off our tamales!

Tamale Dough

2 c. masa harina (It can be found by the flour in the grocery store)
1 (15.5) oz. can chicken broth, warmed
1 tsp. baking powder
1/2 tsp. salt
1/2 c. lard
1 (8 oz.) can creamed corn
1 bag corn husks (Follow soaking directions on the package to pre-soak)

Combine masa harina, baking powder and salt in a bowl. Cut in lard with a pastry blender.  Stir in warm broth and creamed corn to form a soft dough.  Now you are ready to assemble!

Optional Fillings:
-Green Chilies
-Shredded cheese
-Shredded beef (We use Del Real brand pre-cooked shredded beef found at Costco)
-Cooked Chicken
The options are endless!


Lay out a pre-soaked corn husk on your work surface, with the wide side closest to you.


Spread a thin layer of the dough on the husk, leaving about 1/2 inch on each of the sides and only up 3/4 of the way up the husk starting on the large end.


Layer your desired filling ingredients on the dough.  (On this one we put shredded beef, diced green chilies and shredded cheese!)

Now we are ready to fold them up!


Lift up the husk from the left side, and fold over on top of the tamale.


Then fold the right side over (it will be overlapping the the left side).


Lastly, fold the bottom flap up.


Now your tamales are ready to be steamed!
(If you want these to look more decorative, you can take a strip from a husk and tie it around the tamale and knot it, but they will stay together just fine even without it.)


To cook the tamles, you need to fill a large pot with about an inch or two of water and bring to a boil.  Then you you need to use a steamer basked (or in our case, a jimmy-rigged upside down strainer) to put the tamales in so that they are not touching the water. Cover with a damp towel and steam for about 40 to 45 minutes until the tamales are cooked.  They are down when they easily peel away from the husk.  You may need to had more water during the cooking time, so check after 20 minutes or so.


And there you have it, a plate of fresh, homemade tamales!

This recipe makes about 20 tamales, but we quadrulpled the recipe and ended up with about 6 dozen!  These freese really well, and can reheat in the microwave in about 2 minutes.

Tuesday, January 12, 2010

Mint Chocolate Chippers

I didn't get a chance to do any baking around the holidays, but the other night I got to thinking about some special edition Dark Chocolate & Mint chocolate chips that I had bought in anticipation of Christmas season, and how the poor bag was still just sitting in my cupboard.  Not wanting for it to go to waste, I logged on to my Google Reader and found a recipe for "Intimint Chocolate Chip Cookies" that was posted on Picky Palate that used these special chips....perfect!

I whipped these up in no time and boy were they good!  A soft, chewy cookie loaded with dark chocolate, white chocolate and mint chips; a fun twist on a classic.  I was also excited to try out my new non-stick baking mats when making these, they worked just great, and then cleaned up in a snap!  This recipe made about 4 dozen cookies, and knowing that I definitely didn't need that many around my house, I brought over half of them into work with me the next day.  I have a small office, and they didn't last past lunch; everyone loved them!  Unfortunately, it seems that I will have to wait until next year to make these again, as they don't seem to be in the stores anymore, but fingers crossed that they bring them back next holiday season!


Mint Chocolate Chippers
adapted from Picky Palate

1 c. butter, softened
1 c. packed light brown sugar
1/2 c. granulated sugar
2 large eggs
1 Tbsp. real vanilla extract
2 1/2 c. all purpose flour
1 tsp. baking soda
1/2 tsp. salt
1 bag Nestles Limited Edition Dark Chocolate and Mint Morsels
1 c. white chocolate chips

Preheat oven to 350 degrees F. In a stand or electric mixer, beat the butter and sugars until light and fluffy. Beat in eggs and vanilla until well combined. In a large bowl, mix the flour, baking soda and salt. Add to wet ingredients along with the chips. Mix until just combined. With a medium cookie scoop, scoop dough onto a silpat or parchment lined baking sheet about 1 1/2 inches apart. Bake for 9-11 minutes or until slightly golden on outside edges. Let cool for 5 minutes on baking sheet then transfer to cooling rack to finish cooling.

Monday, January 11, 2010

Thai Rama

Ever since we had dinner at Yupha's Thai Kitchen a few weeks ago, where my sister got her first taste of Tom Kha Gai soup, she had been craving another bowl of the soup.  So, a couple of weeks ago, we decided to go to the Arizona 5A-II state football championship game at Sun Devil Stadium in Tempe because our high school, Chaparral was vying for the championship. (They ended up winning!)  We thought it would be fun, but boy did it make us feel old, especially when I realized that I was sitting in those same stands 10 years ago when I was a senior in high school.....wow does time fly!  We had rushed to get to the game in time after work on that Friday, so we didn't have time to eat dinner beforehand, so when we left the game we were hungry!

Since it was a cold December night, my sister really wanted to get some of the Tom Kha Gai soup.  Well, I didn't feel like driving all the way down to Yupha's, and since there seem to be a bunch of Thai restaurants that have recently popped up around ASU's campus, we decided to try someplace new, which is how we ended up at Thai Rama.  I was a little bit skeptical at first because I remembered the restaurant being a place called Char's Thai back when I was in college, and while I had never eaten there, I had heard that it was very old inside.  So we were pleasantly surprised when we walked in and found a restaurant that had been completely remodeled, it was so clean and fresh looking.  The new owner's had put in all new flooring, paint and tables, giving the place a much needed facelift.

We looked over the menu, which was vast, but it didn't take my sister long to decide, she had her mind set on some soup!  But first we decided to get some Crab Puffs as an appetizer.  My sister and I always tend to order crab puffs when we are together, and can you blame us?  Crispy shells filled with creamy cheese and crab, dunked into some sweet and sour sauce....delicious!  These puffs were an excellent version of the classic, they had just the right ratio of crab to cream cheese; which made the filling creamy but didn't overpower the crab flavor.  The shells were perfectly crisped, and were not greasy at all, which is a major bonus.  The portion as huge, it included 6 large wonton stars; so far, so good!


We had just barely finished the crab puffs when our entrees arrived, starting with my sister's soup.  At most restaurants, it is called Tom Kha Gai, but Thai Rama refers to it as Tohm Khah Goong; I am not really sure how the name difference comes into play, but it is the exact same soup.  At Yupha's we had just ordered a small cup of the soup, but at Thai Rama, Laura ordered the full portion; this was served in a silver urn like contraption that has a whole in the middle that is lit on fire to keep the soup warm, it is a pretty common way to serve soup in Thai restaurants, but it didn't stop us from getting a kick out of it!  Laura liked this version of the soup even better than Yupha's, mostly because it used shrimp instead of chicken.  The broth was so flavorful with that hint of coconut, and they had spiced it just right to not make it overly spicy for my spice averse sister.  She raved about how she was going to be addicted to this now, especially since the restaurant is just down the street from where she lives!


I didn't really know what I wanted to order that night since I wasn't really in the mood for Thai food (I agreed because I knew my sister was really craving it, and many times she gives in to my Mexican cravings!), but ultimately I decided on the Khao Paht, or fried rice.  You got to choose between chicken, beef, pork or shrimp to be added to the rice, and I went with the pork at a mild spice level.  I have to say, I didn't have any expectations for this because I wasn't in the mood for Thai, but after my first bite, I was singing a different tune!  The rice was amazing; perfectly seasoned, with a hint of heat.  Although, the best part about it was the pork, they used a tenderloin, and it was the most tender pork I have ever had; it just melted in my mouth.  I had my sister try a bite of it, and she too thought that it was excellent.  The portion was huge, so I took quite a bit of it home and I have to say, it was every bit as good leftover and cold the next morning!


We had a really great meal at Thai Rama, and I can't wait to go back and try some of their other dishes, like the Pad Thai and Panang Curry.  The atmosphere was pleasant, the restaurant was clean, and the servers took excellent care of us.  I noticed that Thai Rama has a few other locations around town, so if you are in the mood for some good Thai food, look them up and find one near you!

Thai Rama
927 E. University Dr.
Tempe, AZ 85281

Monday, January 4, 2010

The Greene House


Starting in early December, over a span of 30 days, my family celebrates my mom's birthday, Christmas, New Year's and my dad's birthday....that is a lot of celebrating!  But even though the holiday season usually has all of our schedules packed, we always make time to celebrate together as a family.  My mom's birthday was on a Thursday night, and when we asked her where she wanted to go, she immediately said The Greene House.  Now for most people this wouldn't sound strange, but my mom is one who doesn't like to have a fuss made about her, and usually responds with an "I don't care" or "You choose," so I knew that The Greene House must be good if my mom actually chose to have her birthday dinner there.  She and my dad had been there a handful of times and she declared that they had her favorite scallop dish, which is why she picked it, since neither my sister nor I had ever been there we were equally excited to check it out.

The Greene House is located in Scottsdale in the Scottsdale Kierland shopping center.  If you have never been to Kierland, I suggest checking it out, especially at night, and during the holidays.  In a city so spread out like Phoenix, it is a true gem; with shops and restaurants on the bottom floors, and condos above, it gives you that city living feeling that we don't really have here.  We had a reservation for 6:30 and were seated promptly at a corner booth/table combination.  My first impressions of the interior were this, crisp, clean, loud and the tables were too close together!  I know that I said Kierland gives you that big city feel, and much like the restaurants that are found in New York and Chicago, The Greene House really packs in the tables to make the most of their space.  I guess I am just spoiled as far as roomy seating goes, but I enjoy a good booth with high backs where I can't overhear the conversation of the people sitting next to me.  But, we were here, and we were hungry, so I just ignored the noise and the extra conversations floating around and focused on the food.

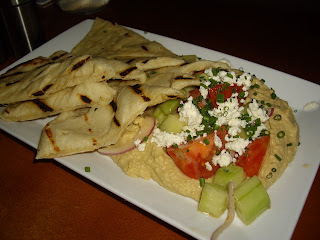
We decided to get a few appetizers to start, first choosing the Herb Hummus that was topped with tomatoes, onions and feta cheese and served with warm flatbread.  My first impression was that I loved the flatbread!  It was definitely made fresh, which was evidenced by the grill marks, and was served warm which brought out a slight sweetness to it.  The combination of the herbed hummus with the cool tomato, onion and cheese with the warm bread was just heavenly.  The portion was quite generous, and could easily be a meal for a non-meater.  I would order it again just for the flatbread alone!


We also decided to get the Tempura Calamari to start with, and we were in for a pleasant surprise when it arrived.  Not only did the dish include delicious, tender pieces of lightly battered calamari sprinkled with sea salt, but there were thinly sliced pieces of zucchini mixed in with it as well!  The zucchini slices were paper thin, giving them a nice cruch, almost like a potato chip, when you bit into them.  We all loved this little bonus, and I may have liked them even more than the calamari!  The dish was served with a sweet chili vinaigrette for dipping; it had just the right balance of heat and sweet that went well with both the zucchini and calamari.  We almost didn't order this dish to begin with, but the empty plate that was left in front of us proved that it was a good last minute decision.


Soon after we finished our appetizers, our entrees arrived, with my mom's beloved scallops coming out first.  The plate had four large scallops that were nicely seared and served with carmelized cauliflower, snap peas and bacon, with the sauce from the veggies drizzled on the plate.  The first thing my mom did once she got her dish was hand the bacon to my dad!  While my mom has nothing against bacon, she is not a huge fan, and knows how much my dad loves it....how sweet is that?  After the bacon was gone, she started in on the scallops, she said they were cooked perfectly as usual, and loves the flavors in the sauce and with the cauliflower. I tried a bite of a scallop, and while they were cooked well, I wasn't as big of a fan of the flavorings, it tasted a bit blah to me, but I have had some amazing scallops lately so maybe that was part of my problem.  Nonetheless, my mom loved her dish, and since it was her birthday, thats all that mattered!


My sister ordered the Harvest Chopped salad and added a grilled chicken breast on top.  She loved the combination of the dark, leafy greens paired with the sweetness of the grapes, apples and strawberries and the tang of the goat cheese.  The salad also was sprinkled with walnuts to give it some crunch, and was dressed in a light vinaigrette.  My sister loves a good salad, and she really loves goat cheese, so she was very happy with her meal.


I had a hard time deciding what to order that night, but ended up going with the Grilled Mahi Tacos.  The dish came with two large tacos loaded with shredded cabbage, pico de gallo, avocado and sprinkled with cojita cheese.  They also came with a side of seasoned white beans.  I tried the beans first, and wow, they were good!  They had a nice smokiness to them, with just a bit of heat; they too had been sprinkled with cojita cheese.  I next tried my taco, it was pretty good, I liked the fresh tortillas and the toppings, but I felt that the fish was a bit overcooked, which made it dry.  I also think the fish lacked some initial seasoning, because besides being dry, they were pretty blah.  The lady at the table next to us had ordered the steak tacos, they looked to be really juicy, so I am thinking I just got some overcooked fish.  But I think my heart still belongs to the fish tacos at Loco Patron...if you haven't tried them....they are a must!


My dad ordered the Twin Kobe Burgers as his entree, I guess he was in a red meat mood but didn't want to mess with a steak.  The burgers were a bit larger than a traditional slider, so the made for a substantial meal.  They were topped with fontina cheese and homemade pickles and served on brioche buns.  My dad ordered his medium-rare, and was very happen to discover upon his first bite that they were cooked perfectly.  As his side dish, he upgraded to the White Truffle Parmesan and Chive French Fires....and Oh My Goodness....they were AMAZING!  Cooked to perfect golden brown and sprinkled with flavor, they were truly some magnificient french fries, and we were all very happy that my dad was in a sharing mood that night!

Since we were there celebrating a birthday, of course we had to get some dessert, and of course we let the birthday girl choose!  I can't say that I wasn't secretly thrilled when she happened to choose the one that I had been eyeing on the menu, the Blueberry Crostata a la mode. It was basically like a mini blueberry pie minus the top crust and topped with vanilla ice cream.  This was delicious!  The crust was rich, buttery and flaky, and the blueberry filling was smooth and sweet.  The crostata was served warm, so eating it with the cool vanilla ice cream was just divine.


Now that I have been to The Greene House, I would likely go back, because overall I felt that food was of superb quality and flavor.  My mom told me that the best time to go there is when the weather is nice, because they do have a patio, and it is not nearly as noisy.  So once the spring comes around again, I might just find myself venturing back to The Greene House for another delicious meal!

The Greene House
15024 N. Scottsdale Rd.
Suite 100
Scottsdale, AZ 85254

Friday, January 1, 2010

My New Year's Cooking Resolutions!

Happy New Year to you all!  I wish you all good health and happiness as we begin this new decade!  I opted for a low-key New Year's celebration this year by attending a New Year's PJ party hosted by my sister and her roommate.  There ended up being 13 of us sporting our finest pajama's while playing board games, munching on food and drinking champagne.  We all had a lot of fun and even took a moment to go and check out the blue moon (although, it didn't look blue to us). 

I have been enjoying a lazy New Year's day, leaving the house just long enough to go and have lunch with my dad, while spending the rest of it lounging in bed, watching football and catching up on my Google reader.  It dawned on me while browsing some new blogs that I need to step outside of my comfort zone and try some new cooking techniques and products this year, as well as make use of some of my current cookbooks/magazines/gadgets that haven't gotten much love in the past.  So I present to you, my list of kitchen resolutions.

My 2010 New Year's Cooking Resolutions

  1. Learn to make Risotto
  2. Enter at least 1 recipe in a recipe contest
  3. Make something that requires the use of a candy thermometer
  4. Make a fish dish that does not start with fish sticks!
  5. Make at least 1 recipe out of each cooking magazine that I get within a month of it showing up in my mailbox
  6. Make an Indian food dish at home
  7. Try brussel sprouts
Here's to a wonderful 2010!